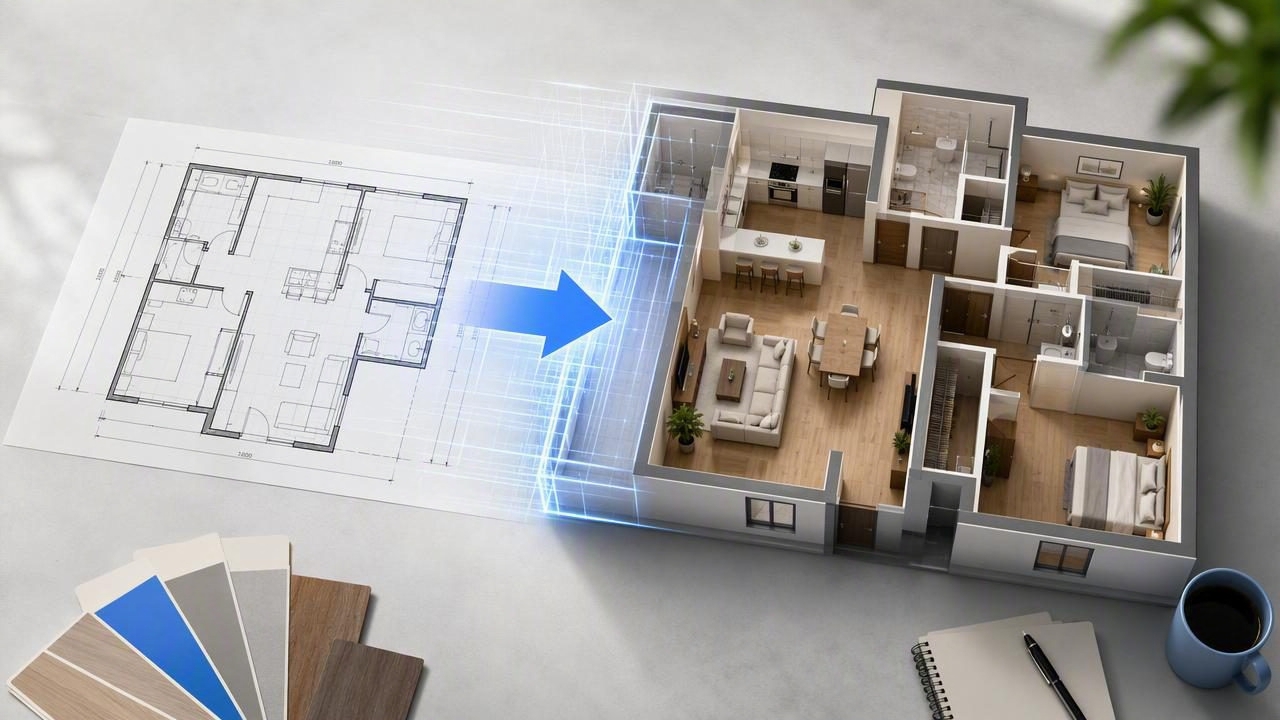
A flat blueprint can contain everything needed to understand a property: room names, walls, openings, dimensions, and circulation paths. Yet even detailed 2D plans can be difficult for homeowners, clients, and contractors to visualize. An app to turn blueprint into 3D provides a more intuitive way to explore a layout before making design decisions.
Instead of interpreting symbols and imagining room volume mentally, you can view a visual concept of the floor plan, consider furniture placement, and compare renovation possibilities. This is especially useful when planning a kitchen update, reworking a small bathroom, staging an empty property, or explaining a proposed layout to someone who does not read technical drawings every day.
However, a 3D image created from a blueprint is a planning and communication aid, not a substitute for measured construction documents. The most useful workflow combines visual exploration with careful verification against the original plan and professional advice where needed.
Why Convert a Blueprint Into a 3D View?
Blueprints are efficient documents, but they are abstract. A thick line may represent a structural wall, an arc may show a door swing, and a small rectangle may indicate cabinetry. These conventions are clear to trained readers, but they can leave room for misunderstanding during a renovation.
A 3D floor plan or room render translates this information into a visual scene. It can help you answer practical questions earlier in the process:
- Will the living room still have a clear route between the sofa and patio door?
- Does a proposed kitchen island make the room feel crowded?
- Which bedroom is most suitable for a home office or nursery?
- Where might daylight enter once furniture is placed?
- How could an empty room look with a specific interior style?
- Can an exterior refresh be presented alongside the interior concept?
The value is not simply that the plan looks more polished. The value is that a 3D visual can make assumptions visible. When everyone can see a layout concept, it is easier to identify questions before ordering finishes, moving walls, or committing to furniture.
What an App to Turn Blueprint Into 3D Can Do
Blueprint-to-3D tools generally begin with a plan image, scan, or exported document. The app interprets visual cues in the source and creates a 3D representation intended to preserve important layout information such as rooms, walls, labels, openings, and overall proportions.
Depending on the workflow, you may then use the result to create room-design concepts, test furnishings, explore finishes, or prepare presentation images. This makes floor plan conversion useful for several audiences:
| Audience | Useful 3D Outcome | Key Question to Check |
|---|---|---|
| Homeowners | Renovation preview | Does the new layout support daily routines? |
| Interior designers | Early style and furniture concept | Does the design match the room shape and circulation? |
| Real estate professionals | Virtual staging direction | Can buyers understand the scale and use of each room? |
| Builders and remodelers | Client-facing visual reference | Does the concept align with the approved scope? |
| Property managers | Space-planning comparison | Which furnishing approach is practical for the unit? |
These visuals are particularly helpful at the early concept stage. They reduce the gap between a technical plan and a discussion about how a finished space may feel.
Start With a Blueprint That Is Easy to Read
The quality of the source image affects the usefulness of a 3D conversion. A clean, high-contrast blueprint gives the app more reliable visual information than a cropped, shadowed, or heavily marked-up photo.
Prepare the source without changing the plan
- Use the full page whenever possible, including the exterior perimeter.
- Make sure room labels, door swings, windows, and major dimensions are legible.
- Crop out unrelated pages, sticky notes, and background clutter.
- Use a straight, well-lit image if photographing a printed blueprint.
- Keep revision clouds or handwritten changes separate if they obscure walls or labels.
- Use the latest approved version rather than an outdated marketing plan.
Do not alter dimensions or erase symbols merely to make the document look cleaner. If information is unclear, it is better to flag it for review than to let a visual tool infer a detail incorrectly.
A Practical Blueprint-to-3D Workflow
The following workflow helps turn a floor plan into a visual planning asset while keeping expectations realistic.
- Define the decision you need to make. Start with a focused goal, such as testing whether a dining table fits near a new kitchen layout. A clear question produces a more useful render than a vague request to make the entire home look nicer.
- Upload or import the clearest available plan. Confirm that the image includes the rooms relevant to your decision. For a whole-home layout review, avoid using a close-up that excludes connecting hallways or adjacent doors.
- Review the generated layout against the source. Compare room count, wall locations, labels, doors, windows, and relative proportions. This step is essential before discussing style, furniture, or renovations.
- Build one design concept at a time. Choose an interior direction, such as warm contemporary, Scandinavian, transitional, or compact workspace. For exterior refresh planning, focus on a few visible elements such as façade color, planting character, lighting, or entry emphasis.
- Check function before aesthetics. Look for blocked paths, oversized furniture, door conflicts, and awkward clearances. A beautiful image is not useful if it suggests an impractical room arrangement.
- Share the concept with clear notes. Label the visual as an early design concept and list assumptions. For example, note that cabinetry, ceiling height, and window placement must be confirmed on site.
Concrete Example: Reimagining a Small Two-Bedroom Plan
Consider a 900-square-foot two-bedroom apartment shown on a black-and-white blueprint. The owner wants to improve the kitchen and create a work area without making the living room feel smaller.
On the 2D plan, the kitchen is an L-shape beside the dining zone. The second bedroom is small but has a window. The living room connects to a balcony through a sliding door. At first glance, the owner considers adding a peninsula to the kitchen and placing a desk behind the sofa.
After converting the plan into a 3D layout concept, the owner can examine the proposal more clearly. The render reveals that a deep peninsula may narrow the route from the entry to the balcony. It also shows that placing a desk behind the sofa could create a compressed circulation zone near the sliding door.
A better early concept may be to use a shallower breakfast ledge, keep a defined walkway to the balcony, and convert the second bedroom into a compact office/guest room with a wall-mounted desk. The 3D view does not prove that the final construction solution works, but it gives the owner a specific direction to discuss with a designer, contractor, or building professional.
Important: Treat the render as a visual hypothesis. Confirm measurements, structural constraints, building rules, electrical needs, plumbing locations, and accessibility requirements before construction.
How to Check a 3D Render Against the Blueprint
Before you use any 3D render in a renovation conversation or presentation, compare it with the plan systematically. This protects you from making decisions based on an attractive image that does not reflect the actual layout.
Use this visual verification checklist
- Exterior footprint: Does the outer shape generally match the source plan?
- Room relationships: Are adjoining rooms in the correct sequence?
- Doors: Are their locations and swing directions represented sensibly?
- Windows and openings: Are they placed on the appropriate walls?
- Labels: Do room names correspond to the original plan?
- Proportions: Does a narrow corridor remain narrow, and does a larger room remain relatively larger?
- Furniture logic: Does the proposed furniture leave usable paths and respect openings?
If an important element is missing or appears wrong, return to the source image and verify whether the information was unclear, cropped, faint, or inconsistent. Do not assume the visual is an exact measurement simply because it appears realistic.
Common Mistakes When Using 3D Blueprint Conversion
Most problems arise not from using a 3D tool, but from assigning it a role it cannot perform. Avoid these common mistakes:
- Using a render as a construction drawing: Generated images are not CAD or BIM files and do not provide engineering approval.
- Skipping the source review: A missing window or incorrect door location can change the usefulness of an entire room design.
- Judging scale only by furniture: Furnishings help create a sense of scale, but their appearance does not confirm exact clearance dimensions.
- Changing several variables at once: Test layout, color palette, and furniture style separately when possible, so you can tell what actually improves the room.
- Ignoring real-world constraints: Existing services, load-bearing elements, permits, budgets, and lease restrictions can affect what is possible.
Use 3D Concepts to Communicate, Not Just Decorate
A strong 3D plan can make a renovation conversation more productive. Rather than saying, “I want the room to feel open,” you can point to a specific route, seating arrangement, storage wall, or kitchen work zone. This gives collaborators something concrete to respond to.
For presentations, pair the render with a short summary of what it is intended to show. Identify the source plan, the design goal, key assumptions, and the details still requiring confirmation. This keeps the visual persuasive without overstating its precision.
For an accessible way to explore this process, Floor Plan to 3D & Home Redesign explains how floor plan conversion can support early 3D visualization. Use generated concepts to compare ideas and communicate intent, then rely on qualified professionals and verified measurements for final project decisions.
Final Takeaway
An app to turn blueprint into 3D can make floor plans easier to understand, helping you explore room layouts, home redesign ideas, and renovation previews before work begins. The best results come from a clear source plan, a specific planning question, and a careful comparison between the render and the original drawing.
Use 3D visuals to uncover opportunities, improve discussions, and refine your design direction. Just remember that a compelling render is the start of a better planning process—not the final authority on what can be built.
