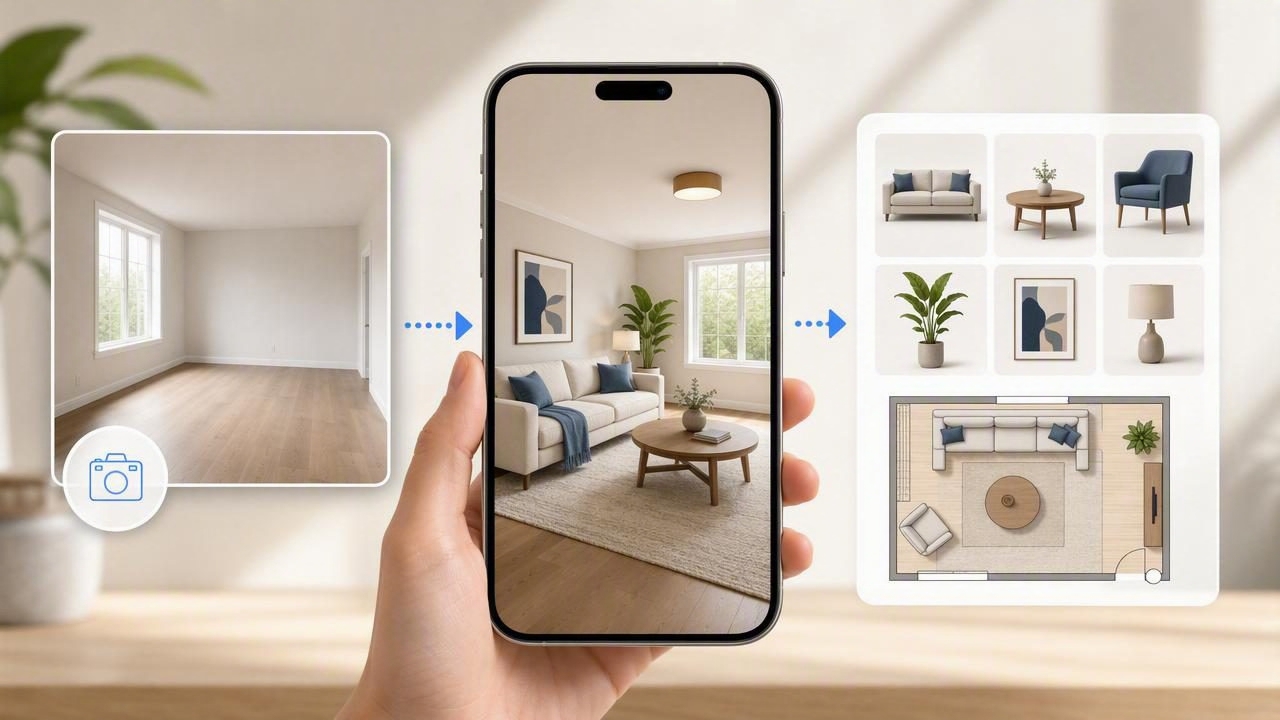
Knowing how to get realistic design previews with a virtual staging app can make renovation discussions, property listings, and interior design decisions far easier. A well-made preview helps people see the potential of an empty, dated, or unfinished room before money is committed to furniture, finishes, or construction.
However, realism is not just about selecting an attractive design style. It depends on the quality of the source image or floor plan, the accuracy of the room layout, the scale of furnishings, lighting consistency, and a careful review of the final image. Virtual staging is most useful when it is treated as a visual planning tool rather than an exact construction drawing.
This guide explains how to create more believable staging concepts, what to check before sharing them, and where the limits of AI-generated design previews matter.
Start With a Clear Goal for the Design Preview
Before uploading a room photo or floor plan, define what the preview needs to communicate. A staging concept for a real estate listing has a different purpose from one used to compare renovation ideas for your own home.
- Property marketing: Show how an empty room could function as a bedroom, office, dining area, or lounge.
- Renovation planning: Compare finishes, furniture zones, storage options, and traffic flow before purchasing.
- Client presentations: Give homeowners or stakeholders a clear visual direction for discussion.
- Room repurposing: Test whether a spare room could work better as a nursery, study, guest room, or gym.
A narrow goal produces a more coherent result. For example, instead of requesting a vague “modern living room,” decide that the preview should show a family-friendly living room with seating for five, a clear route to the patio door, and storage for toys. Those constraints make it easier to judge whether the staged image is genuinely useful.
Use the Best Available Source Image or Floor Plan
Realistic virtual staging begins with reliable visual input. AI can add furniture and refresh finishes, but it cannot fully compensate for a poorly framed photo, missing walls, or a floor plan that is too blurry to interpret.
For room photos
- Use a bright, sharp image with the major walls, windows, doors, and floor visible.
- Photograph from a corner or doorway so the room depth is easier to understand.
- Keep the camera level where possible. Severe tilt can distort vertical lines and furniture placement.
- Remove temporary clutter when possible, especially items that hide corners, radiators, outlets, or door swings.
- Capture the room in natural or balanced lighting so the app can better interpret materials and shadows.
For floor plans and blueprints
- Upload the clearest version available, ideally with room labels and dimensions visible.
- Make sure walls, openings, stairs, and fixed features are not cropped.
- Use a plan that reflects the current layout, not an outdated pre-renovation version.
- Check that the scan is upright and has enough contrast for doors and room boundaries to be readable.
If a photo shows only one wall, the generated concept may still be visually appealing, but it will offer less confidence about the complete room arrangement. Likewise, a floor plan conversion can provide a helpful 3D perspective, yet it should always be compared back with the original plan.
Match Furniture Scale to the Actual Room
Oversized sofas, miniature dining tables, and blocked doorways are among the fastest ways to make a staged image look artificial. Realism comes from choosing furniture that fits both the room dimensions and the intended use.
Use approximate measurements from the floor plan or room survey to guide your decisions. You do not need to calculate every millimeter for an early concept, but major pieces should be plausible.
| Room Element | Useful Reality Check | Why It Matters |
|---|---|---|
| Sofa | Leave a sensible path around it and avoid covering windows or doors. | Maintains circulation and keeps the room functional. |
| Dining table | Allow room for chairs to pull out. | Prevents a polished but unusable layout. |
| Bed | Confirm access to both sides and wardrobes where needed. | Shows whether the bedroom can work day to day. |
| Rug | Use a size that anchors the furniture grouping. | Creates a more natural, professionally styled look. |
| Storage | Keep cabinet depths and opening directions in mind. | Reduces conflicts with walkways and doors. |
A useful rule is to stage the room for normal movement, not just for the camera. If someone could not comfortably enter, sit down, open a door, or reach storage in the preview, revise the concept.
Keep the Style Consistent With the Architecture
Even high-quality furniture can feel unrealistic when it conflicts with the building’s character. A sleek ultra-minimal design may look out of place in a traditional cottage, while ornate furniture can overwhelm a compact contemporary apartment.
Look at fixed elements that are unlikely to change: window proportions, ceiling height, flooring, fireplace placement, trim, kitchen cabinetry, and exterior views. Then choose a design direction that complements those features.
For example, imagine an empty 12-by-14-foot room with one large window and a door to a hallway. The aim is to stage it as a home office and occasional guest space. A realistic concept might include:
- A compact desk placed near the window to take advantage of daylight.
- A slim sleeper sofa against the longest uninterrupted wall.
- Closed storage that does not interfere with the door swing.
- A neutral wall color with warm wood accents that echo the existing floor.
- A modest rug and one or two accessories rather than excessive decor.
This arrangement communicates a specific function without pretending that the room is larger than it is. That is the key difference between credible virtual staging and a generic inspiration image.
Pay Attention to Lighting, Shadows, and View Direction
Lighting makes an enormous difference to perceived realism. When furniture appears to receive light from a different direction than the room’s windows, the result can look pasted in. Similarly, overly dark corners or harsh artificial lighting can make a design feel disconnected from the source photo.
When reviewing a preview, look for these visual signals:
- Do shadows generally fall in a direction that makes sense for the windows?
- Do reflective surfaces such as mirrors, glass tables, and polished floors look plausible?
- Does the brightness match the original room, or has the image become unrealistically bright?
- Are exterior views, window frames, ceiling lines, and architectural features preserved?
- Do furniture legs appear to meet the floor naturally?
If the answer to several of these questions is no, generate another option or simplify the styling request. A calmer design with fewer reflective objects is often more believable than a heavily decorated scene.
Use Specific Prompts and Constraints
Virtual staging tools generally respond better to focused instructions than broad style labels. Mention the room purpose, the preferred style, essential furniture, color direction, and what must remain unchanged.
Here is an example of a practical staging brief:
Stage this empty living room as a warm contemporary family space.
Keep the existing windows, doorway, and wood flooring unchanged.
Add a three-seat sofa, two compact chairs, a low coffee table,
a large neutral rug, and practical closed storage.
Use beige, soft green, and natural oak accents.
Keep clear walking space from the doorway to the window.
The request is detailed enough to guide the concept without demanding impossible precision. Avoid relying on phrases such as “make it perfect” or “fit everything.” Instead, identify priorities and generate multiple concepts for comparison.
Review the Layout Before You Trust the Image
A realistic-looking image can still contain layout errors. Before using a preview in a listing, proposal, or renovation discussion, compare it with the original image or plan.
Essential review checklist
- Verify that doors, windows, columns, stairs, and radiators are in the correct locations.
- Check whether the design blocks pathways, door swings, or access to windows.
- Confirm that the room’s apparent proportions remain close to the source.
- Look for missing architectural details or new features that do not exist.
- Make sure furnishings support the intended room function.
- Label the image appropriately if it will be shown to buyers or clients as a conceptual visualization.
Important: A virtual staging image is a design concept, not a measured CAD or BIM model. It should not be used as an engineering approval, construction document, or guarantee that every proposed item will fit.
For projects involving cabinetry, structural work, electrical changes, plumbing, or built-in furniture, confirm measurements on site and consult qualified professionals where required.
Compare More Than One Design Direction
One of the strongest uses of a virtual staging app is rapid comparison. Instead of debating a design in the abstract, review two or three purposeful alternatives side by side.
For a small bedroom, you could compare a calm Scandinavian layout, a boutique-hotel look, and a storage-focused design. Keep the architectural shell constant while changing only the style and furniture priorities. This makes the choice clearer because you can evaluate comfort, usability, and visual impact separately.
Do not generate dozens of unrelated options. Too many concepts can make decisions harder. A better approach is to select three options, note what works in each one, and create a refined final concept based on those observations.
Prepare Previews for Sharing Without Overstating Them
High-resolution previews can be valuable in a mood board, homeowner presentation, listing package, or renovation meeting. Include a short note explaining the intended purpose, especially when the image contains furniture, finishes, or landscaping that are not currently present.
For example: “Conceptual virtual staging shown for layout and style discussion. Final selections and dimensions require site verification.” This keeps expectations clear while preserving the usefulness of the visual.
For floor-plan-based concepts and AI-guided room ideas, Floor Plan to 3D & Home Redesign’s guide to AI room design offers additional context on turning source visuals into room concepts. Review each generated layout against your original photo or plan before making purchasing or construction decisions.
Conclusion: Realism Comes From Verification
The most convincing virtual staging previews are not necessarily the most elaborate. They are the ones that preserve the room’s defining features, use furniture at believable scale, respect circulation, align with the available light, and communicate a clear purpose.
Start with a strong source image or readable floor plan, provide practical constraints, and review the result critically. With that workflow, virtual staging becomes more than a decorative image: it becomes a useful way to explore interior design possibilities before moving forward.
