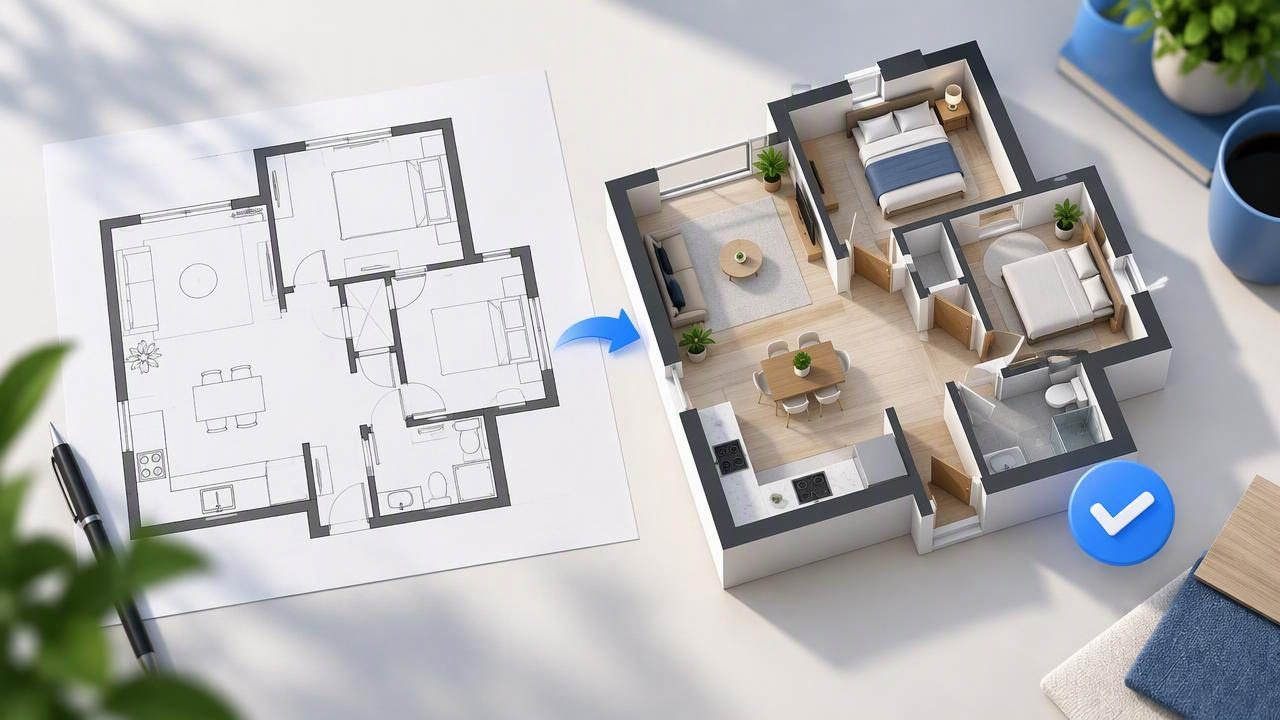
A 3D floor plan visualization can make a layout easier to understand than a flat drawing. You can see how rooms connect, where doors open, and how a proposed style might feel. But a polished image is not automatically a faithful one. A renderer may interpret an unclear symbol incorrectly, miss a small opening, or show a room arrangement that differs from the source plan.
To get a useful result, treat the render as a visual concept to review—not as proof that every wall, measurement, or building detail is correct. Compare it systematically with the original, record uncertainties, and make clear what the image can and cannot confirm. This guide explains how to review a 3D floor plan renderer’s output and gives a practical example you can apply before sharing a concept.
What “faithful” means in a 3D floor plan visualization
Faithfulness is not just about whether the render looks realistic. It describes how well the image communicates the source plan’s visible information. A useful review considers several layers:
- Room relationships: Are the spaces arranged and connected in the same way as the drawing?
- Visible features: Do doors, windows, stairs, and other clearly marked elements appear in plausible locations?
- Labels and intent: Are room names and other annotations understood correctly?
- Overall proportions: Do rooms appear broadly consistent with the drawing, without treating the image as measured geometry?
- Presentation choices: Are finishes, furniture, and camera angle helping explain the layout rather than hiding it?
These are separate questions. A render could communicate the room arrangement well while depicting a window incorrectly. It could also look attractive while making a narrow passage seem wider than the drawing suggests. Reviewing each layer helps you describe the image accurately instead of relying on a single judgment such as “it looks right.”
Start with what the source actually shows
Before comparing the render, identify the information you can confidently read from the plan. Look for room boundaries, door swings, window symbols, labels, stairs, and any written dimensions. Note which details are faint, cropped, obscured, or ambiguous. A black mark might represent a wall, a fixture, or a scanning artifact; the drawing alone may not settle the question.
Separate observed details from assumptions. For example, “the plan labels this space ‘Bedroom 2’” is an observation. “The narrow rectangle is a built-in wardrobe” may be an assumption unless a legend or note confirms it. This distinction matters because a renderer can create a coherent-looking interpretation of ambiguous input without proving that interpretation is correct.
Check that the full drawing is visible, including its edges and any notes or labels that affect how the layout should be understood. A clear source can make review easier, but clarity does not guarantee that generated geometry will match the original. Keep the source available throughout the review rather than judging the render from memory.
Compare the render in a consistent order
A simple, repeatable comparison is more reliable than scanning the image for whatever catches your eye. Review from the largest relationships to the smallest visible details:
- Trace the circulation. Follow the route from the entrance through the main spaces. Check whether the connections and openings correspond to the drawing.
- Compare the room arrangement. Look at which rooms border each other and where they sit in relation to the entrance, stairs, and exterior walls.
- Check openings and fixed features. Compare visible doors, windows, staircases, fireplaces, or other clearly indicated elements. Pay particular attention to which wall each feature occupies.
- Review labels and room use. Confirm that the render has not confused a room name or interpreted a symbol as a different feature.
- Look for visual distortion. Perspective, furniture, shadows, and wall height can make spaces appear larger, smaller, or more open than a flat plan suggests.
When possible, keep the source and render side by side. Use the same sequence each time, and write down a specific observation rather than a broad verdict. “The render appears to place the living-room window on the south wall; the plan marks it on the east wall” is more useful than “the window looks wrong.”
Example: checking an open-plan living and dining area
Imagine a source plan that labels a combined living and dining space, shows a kitchen opening on the north side, and marks a window on the east exterior wall. The generated 3D image looks convincing: a dining table sits near the kitchen, a sofa faces an interior wall, and daylight enters the room. That impression is not enough to establish fidelity.
Compare the key details. Is the kitchen opening on the same side as the source? Does the living area connect to the hall through the same opening? Is the window shown on the east wall, or has the renderer placed it behind the sofa on another wall? Does furniture cover a doorway or make a passage look closed? If an element is difficult to see, mark it as unclear rather than assuming it is correct.
Suppose the room connections appear consistent, but the window placement is uncertain and the table makes the route from the hall look tight. Your review might say: “The overall open-plan arrangement appears consistent with the source. Please verify the window wall against the original drawing. Furniture placement is illustrative and should not be used to assess clearances.” That note preserves what the image communicates while flagging what needs attention.
Use a simple review table
A short checklist can help homeowners, designers, or property teams discuss a render without confusing visual appeal with verified dimensions. Adapt the table to the details that matter in your plan.
| Item to review | What to compare | How to record it |
|---|---|---|
| Room connections | Openings and routes between spaces | Consistent, differs, or unclear |
| Doors and windows | Visible location and wall | Note the specific mismatch or uncertainty |
| Room labels | Names and intended room use | Quote the source label when possible |
| Furniture and finishes | Whether styling obscures the layout | Identify items as illustrative |
| Dimensions | Written values on the source, if present | Do not treat the render as a measurement check |
Use “consistent” only for what you can actually compare. “Unclear” is a meaningful result: it tells the next reviewer where the source or viewpoint does not provide enough evidence. Avoid turning a visual impression into a numerical accuracy score unless you have a defined, appropriate measurement method.
Common reasons a render can mislead
Perspective changes how space feels
A 3D camera angle adds depth and can exaggerate distance. A wide view may make a compact room feel expansive, while a close view can make a doorway seem prominent. Perspective is useful for communication, but it is not a reliable way to judge exact room size.
Styling can hide layout clues
Furniture, rugs, plants, wall colors, and shadows can make a concept easier to imagine. They can also cover wall junctions, openings, or floor areas that would otherwise help you compare the render with the plan. If a detail matters, look for a view where it remains visible or keep an unstyled source nearby.
Ambiguous symbols invite interpretation
Older plans, low-resolution scans, unusual conventions, and missing legends can leave room for multiple readings. A renderer may produce one plausible-looking version, but plausibility is not confirmation. Consult the plan’s notes or an appropriate professional when the distinction affects design or construction decisions.
Written dimensions do not validate the image
A plan may include measurements, yet a generated visual concept should not be treated as a measured CAD or BIM model. Do not use its apparent scale, wall lengths, clearances, or proportions as guaranteed construction dimensions. A source that is easy to read does not guarantee accurate generated geometry.
How to share the result responsibly
When you present a 3D floor plan visualization, include enough context for viewers to understand its status. Keep the original plan available, describe the render as a visual concept, and identify any details that remain unverified. If the image includes proposed furniture, finishes, or room styling, explain that those choices are illustrative unless they have been separately confirmed.
For renovation decisions, use the image to discuss questions such as “Does this arrangement communicate the intended connection?” or “Would this finish direction suit the room?” Do not use it to approve structural changes, establish code compliance, confirm engineering requirements, or order materials based on apparent dimensions. Those decisions require appropriate drawings, measurements, and qualified review.
If you need a visual starting point from a plan, Floor Plan to 3D & Home Redesign’s guide to floor plan conversion explains the general process. Any generated image should still be checked against its source before it is used in a proposal or presentation.
A practical standard for faithful visualization
The most dependable floor plan render is not necessarily the most elaborate one. It is the one whose visible layout can be discussed clearly, whose uncertain details are acknowledged, and whose decorative choices do not disguise important differences. Compare room relationships first, inspect openings and labels, and document mismatches in plain language.
Most importantly, keep the purpose of the image in view. A 3D floor plan renderer can help people understand and discuss a design concept, but visual similarity is not a substitute for measured drawings or professional verification. Treat the render as a communication aid, check it against the source, and be explicit about what remains to be confirmed.
