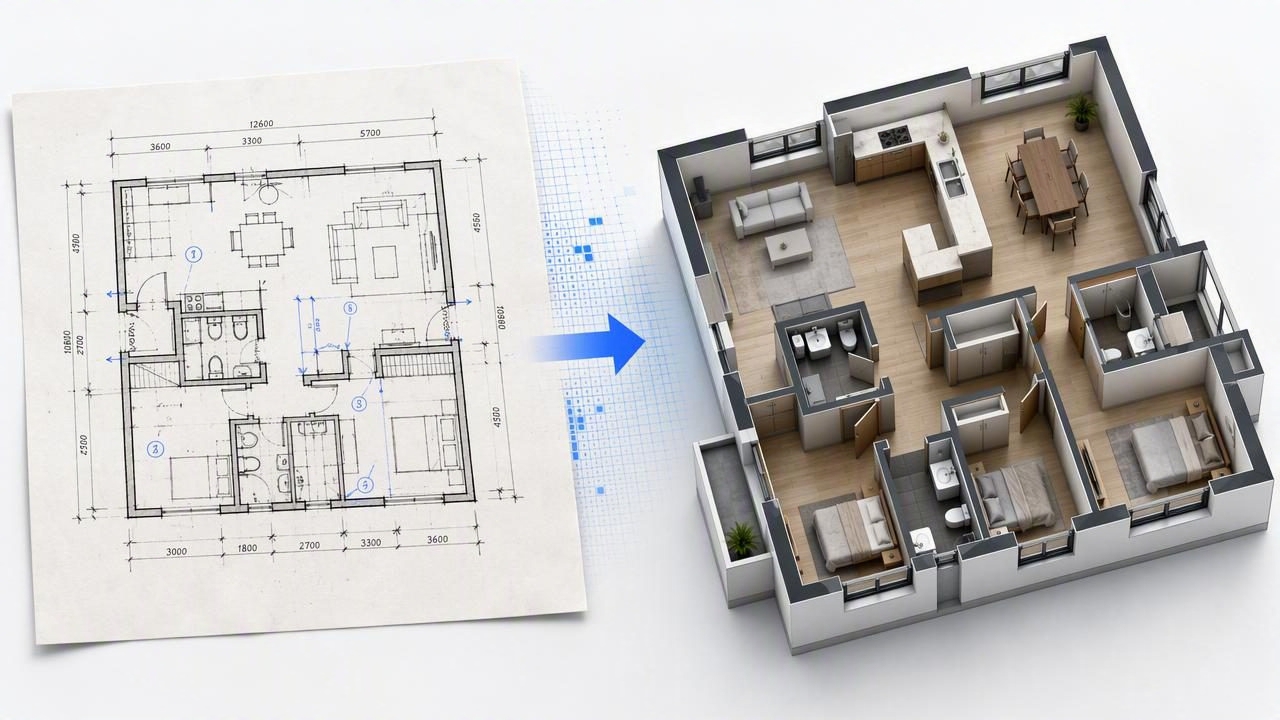
If you need to convert a scanned floor plan to 3D, the goal is not simply to create an attractive image. A useful 3D result should make the original layout easier to understand while retaining the information that matters: room relationships, walls, doors, windows, labels, and approximate proportions.
Scanned plans are common in renovation projects, property listings, inherited homes, and early design discussions. They may come from an old paper drawing, a black-and-white blueprint, a PDF, or a photographed plan. While these files can contain valuable layout information, they are often difficult for homeowners, clients, and contractors to visualize. A 3D floor plan conversion can turn a flat drawing into a clearer visual concept for interior design and renovation previews.
This guide explains how to prepare a scan, interpret the source plan, create a 3D concept, and check the result before using it in a proposal or design conversation.
What Does It Mean to Convert a Scanned Floor Plan to 3D?
Converting a scanned floor plan to 3D means using the visible information in a two-dimensional drawing to create a three-dimensional representation of the space. The process can include walls, openings, room zones, furniture placement, finishes, and viewing angles that make the plan easier to read.
A scanned plan may show only lines and symbols, while a 3D render can show how a kitchen connects to a dining area, whether a hallway feels narrow, or how much visual separation exists between a bedroom and a living room.
However, it is important to understand the difference between a visual planning tool and a technical construction document. A 3D conversion based on a scan is useful for exploring layout and home redesign ideas, but it is not automatically a measured CAD or BIM model. It should not replace site measurements, engineering drawings, permits, or professional construction approvals.
Why Scan Quality Matters Before Floor Plan Conversion
The clarity of the source image has a direct effect on the quality of the 3D interpretation. A clean scan makes it easier to identify walls, room names, doors, window symbols, dimensions, and notes. A blurry or skewed photograph can make those same elements ambiguous.
Before starting the conversion, inspect the plan for issues that could affect the result:
- Low resolution that makes dimensions or labels unreadable
- Dark shadows from a phone photo of a paper plan
- Pages photographed at an angle rather than straight overhead
- Fold lines, handwriting, stamps, or marks covering wall lines
- Multiple overlapping revisions on the same drawing
- Missing pages for upper floors, basements, garages, or extensions
If possible, use the original PDF or a high-resolution scan instead of a compressed screenshot. For a photographed plan, crop the page edges, straighten the image, and increase contrast carefully. Do not sharpen the file so aggressively that thin wall lines, symbols, or labels disappear.
Information to Identify on the Original Plan
Before generating a 3D view, take a few minutes to read the plan as a document. The most successful floor plan conversions begin with a clear understanding of what the drawing actually shows.
| Plan Element | Why It Matters in 3D | What to Check |
|---|---|---|
| Exterior walls | Defines the overall building footprint | Look for thick lines, wall offsets, and additions |
| Interior partitions | Separates rooms and circulation areas | Confirm which lines are walls versus furniture symbols |
| Doors | Shows movement between spaces | Check swing direction and openings near corners |
| Windows | Influences light and exterior views | Note size, location, and grouped window openings |
| Room labels | Supports appropriate furnishing and design choices | Watch for abbreviations such as “BR,” “WC,” or “STOR” |
| Dimensions | Helps assess relative scale | Check units and identify whether dimensions are readable |
Pay particular attention to rooms with unclear functions. For example, a small rectangular area beside a kitchen might be a pantry, utility room, closet, or service corridor. If the plan does not clearly label it, avoid making a major design decision based only on an assumption.
A Practical Workflow for Converting a Scanned Floor Plan to 3D
- Choose the clearest source file. Use a complete plan with visible labels and dimensions. If there are several versions, select the latest revision or compare them before proceeding.
- Confirm the floor level. A plan may cover only one story. Label the source clearly as ground floor, first floor, basement, or another level so rooms are not combined incorrectly.
- Review the perimeter first. Check the outside shape, setbacks, porches, bay windows, balconies, garages, and other footprint changes before focusing on furniture or finishes.
- Map room connections. Trace the route from the entry through key spaces. This reveals whether a door leads into a room, a closet, a bathroom, or a hallway.
- Create the 3D visual concept. Use the scan as the layout reference, then add room purpose, furnishing, materials, and style choices appropriate to the intended renovation preview.
- Compare the result against the original plan. Check wall positions, door locations, window placement, and room labels before relying on the render in a presentation.
This comparison step is essential. A visually polished render can still be misleading if it removes a doorway, shifts a window, or turns a storage room into usable living space. Treat the original drawing as the primary reference and the 3D image as a communication aid.
Concrete Example: Updating a Small Two-Bedroom Layout
Imagine a homeowner has a scanned black-and-white plan for a compact two-bedroom apartment. The plan shows an entry hall, a small kitchen, a living and dining room, one bathroom, two bedrooms, and a narrow storage closet. The owner wants to explore whether the living area can feel larger before committing to a renovation.
First, identify the fixed layout elements: the exterior walls, the kitchen location, bathroom plumbing zone, bedroom doors, and window positions. These should remain consistent in the 3D concept because moving them would change the layout rather than simply redesigning it.
Next, use the 3D view to test visual improvements. The living room could use a smaller sofa, a round dining table, lighter wall finishes, and a low-profile media unit. The kitchen might be shown with brighter cabinet fronts and improved task lighting. If the floor plan indicates a wall between the kitchen and living room, do not remove it in the preview unless the homeowner is specifically considering that structural change and plans to verify feasibility with a qualified professional.
The resulting render can help answer practical questions:
- Does the dining table block the route from the entry to the bedrooms?
- Would a sectional sofa make the room feel crowded?
- Is there enough apparent clearance around kitchen cabinetry?
- Would matching flooring create a more connected visual flow?
- Does the window placement support the preferred furniture arrangement?
These are valuable design questions, but they are not the same as construction measurements. Confirm clearance requirements, structural conditions, electrical locations, and final dimensions on site.
How to Preserve Layout Details in a 3D Render
When you convert a scanned floor plan to 3D, small details can have a large effect on whether the concept feels trustworthy. Use a simple verification checklist after creating the first version.
- Count rooms: Make sure every labeled room on the source plan appears in the concept.
- Check openings: Compare the number and placement of doors and windows.
- Review circulation: Follow the route from entry to living areas, bedrooms, bathrooms, and outdoor spaces.
- Compare proportions: Look for rooms that appear unusually wide, narrow, long, or shallow compared with the plan.
- Retain labels when needed: Room names can help clients understand the render during early planning.
- Flag uncertainty: Mark unclear areas rather than presenting assumptions as confirmed facts.
Useful rule: If a detail is unreadable in the scan, treat it as uncertain until it can be checked against a clearer drawing or an on-site measurement.
Common Mistakes to Avoid
One common mistake is treating every line in an old blueprint as a wall. Plans may include cabinets, built-in furniture, ceiling features, property boundaries, or demolition notes that look similar to structural lines at a glance.
Another mistake is using a highly stylized interior design concept to hide layout uncertainty. Decorative finishes can make a render appealing, but they should not distract from missing doors, altered room boundaries, or incorrect window positions.
Also avoid assuming that a dimension on a scan is exact. Printed plans can be resized, copied, distorted by scanning, or photographed unevenly. Read visible dimensions as helpful reference points, then verify critical measurements independently before ordering furniture, materials, or construction work.
When a 3D Floor Plan Is Most Useful
A 3D conversion is especially helpful when people need to discuss a space without interpreting technical drawings. Homeowners can compare renovation previews, real estate professionals can explain room flow, and interior designers can communicate furniture ideas before preparing more detailed specifications.
High-resolution images may also support mood boards, early client presentations, property marketing concepts, and conversations about an exterior refresh. For exterior work, keep the building shape and visible openings aligned with the source material, while treating landscaping, paint colors, and decorative upgrades as visual options rather than final construction instructions.
Final Takeaway
The best way to convert a scanned floor plan to 3D is to combine a clear source image with careful review. Start with the layout, verify walls and openings, use the render to test interior design ideas, and keep technical decisions separate from visual exploration. A strong 3D concept should make a plan easier to understand without claiming a level of measurement accuracy the scan cannot support.
For a guided visual workflow, Floor Plan to 3D & Home Redesign explains how floor plan-to-3D concepts can be used to review layouts and renovation ideas. As with any visual conversion, compare the generated layout with the original source and confirm critical details before construction.
