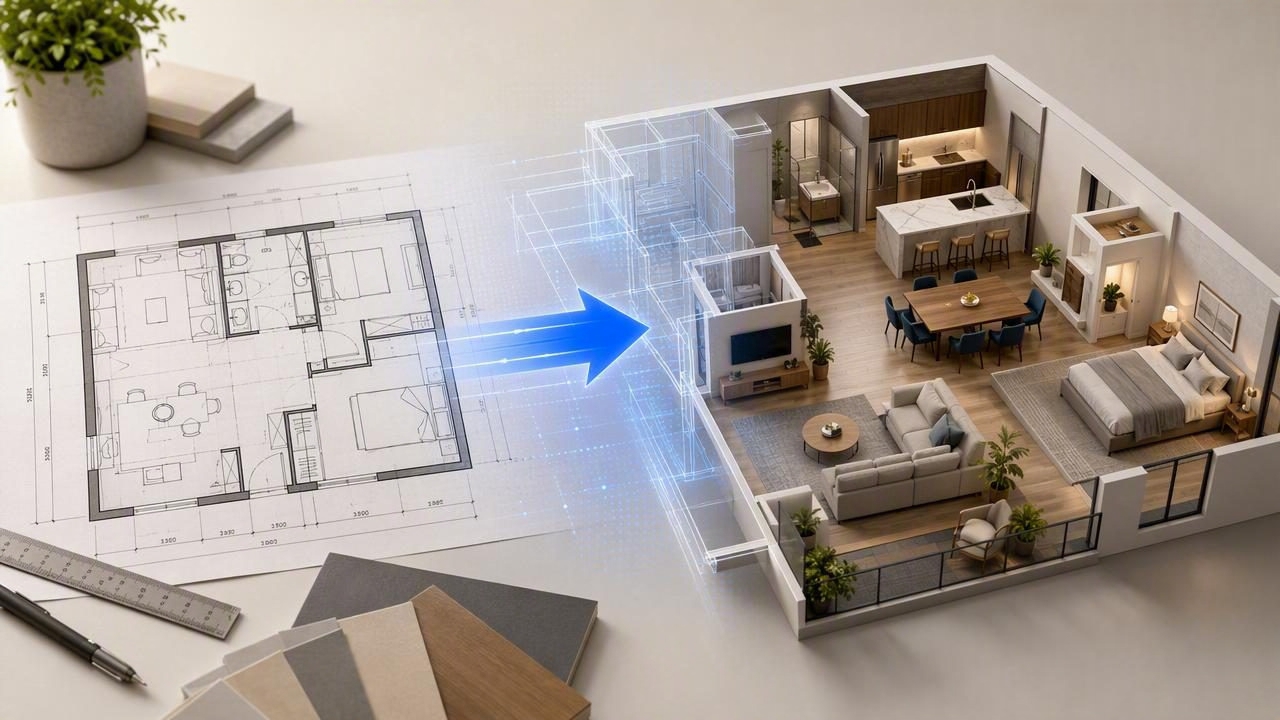
A blueprint to 3D converter helps interior designers turn technical drawings into visual spaces that clients can understand immediately. Instead of asking a homeowner to interpret wall symbols, dimensions, door swings, and room labels, designers can present a furnished 3D view that shows how a layout may look and feel.
This process is useful for renovations, new construction consultations, space planning, virtual staging, and early design presentations. A converted floor plan can become the starting point for furniture layouts, finish selections, lighting concepts, and realistic renovation previews. The goal is not to replace professional construction documentation. It is to make design decisions clearer before major money, labor, or materials are committed.
This blueprint to 3D converter guide for interior designers explains how to prepare plans, evaluate conversion quality, build a dependable workflow, and use 3D renders to communicate design concepts with more confidence.
Why Interior Designers Convert Blueprints Into 3D
Traditional floor plans are essential working documents, but they are abstract. Experienced designers, architects, contractors, and builders can read them quickly. Many clients cannot. Even when a plan is accurate, it may be difficult for a client to picture scale, circulation, sightlines, furniture placement, or the effect of removing a wall.
A 3D floor plan bridges that communication gap. It turns room boundaries into visible volumes and gives users a more intuitive way to evaluate the proposed space. This is particularly valuable when working with homeowners who are anxious about renovation choices or unsure whether a layout will support daily life.
- Faster client understanding: Clients can see room relationships without learning drafting conventions.
- Better furniture planning: Designers can test whether sofas, beds, tables, and storage fit the available footprint.
- Clearer renovation discussions: A 3D model makes it easier to review walls, openings, kitchen zones, and circulation paths.
- More persuasive presentations: Visual concepts often communicate design intent more effectively than notes alone.
- Early error detection: Proportion issues, awkward clearances, and misplaced openings can become more obvious in 3D.
What a Blueprint to 3D Converter Should Preserve
The best results begin with accurate source information. A converter may use image recognition, AI-assisted interpretation, or manual adjustments to identify the main elements of a drawing. However, the output is only as dependable as the plan and the review process behind it.
For interior design work, prioritize tools and workflows that preserve the layout rather than merely creating an attractive generic room. The core geometry should remain faithful to the original drawing.
| Plan Element | Why It Matters in 3D | What to Verify |
|---|---|---|
| Wall locations | Defines room size, circulation, and furniture zones | Interior and exterior walls align with the source plan |
| Dimensions | Supports realistic scale and product planning | Known measurements match the converted model |
| Doors and swings | Affects clearance, accessibility, and furniture placement | Opening direction and location are correct |
| Windows | Influences lighting, views, and elevation planning | Window placement and approximate width are retained |
| Room labels | Prevents confusion across multi-room projects | Bedrooms, bathrooms, storage, and utility areas are identified |
| Fixed fixtures | Guides kitchen, bath, and renovation concepts | Plumbing fixtures, stairs, islands, and built-ins are reviewed |
A beautiful render is not automatically an accurate design tool. Before selecting finishes or presenting an option as viable, confirm the converted geometry against the original blueprint and, where possible, the site measurements.
Step 1: Prepare the Blueprint Before Conversion
Clean input leads to cleaner output. Whether you are using a scanned plan, photographed blueprint, PDF export, or hand-drawn layout, spend a few minutes preparing the file before uploading it to a floor plan conversion tool.
- Use the clearest available plan. Choose a high-resolution PDF or a flat, well-lit scan instead of a dark phone photo with shadows.
- Crop unnecessary borders. Remove unrelated pages, title blocks, handwritten notes, and surrounding clutter when possible.
- Check orientation. Rotate the drawing so it is upright and easy to review.
- Make dimensions legible. If important measurements are unreadable, record them separately for later verification.
- Separate floors. Convert each level independently when working with multi-story homes.
- Identify scope boundaries. Note whether the project covers the entire home, one floor, or only selected rooms.
For renovation projects, collect supplementary information at the same time: site photos, ceiling heights, window sill heights, appliance specifications, existing furniture measurements, and notes about non-movable elements. These references help transform a basic 3D floor plan into a useful interior design model.
Step 2: Convert the Floor Plan and Check the Base Layout
Once the plan is uploaded, the conversion process typically recognizes walls, rooms, openings, and labels, then creates a 3D representation. Some tools provide an automated result, while others require manual edits to correct ambiguous lines or incomplete plan symbols.
Do not begin decorating immediately. First, conduct a layout review. This stage is where designers protect accuracy and avoid presenting a concept based on a misread blueprint.
Use a simple verification order
- Confirm the overall building footprint.
- Check exterior walls, interior partitions, and room boundaries.
- Compare at least two known dimensions with the model.
- Review doors, windows, stairs, and major openings.
- Confirm kitchen, bathroom, utility, and storage locations.
- Review ceiling assumptions before planning tall cabinetry or lighting.
“Treat the first 3D output as a visual draft, not as final construction truth. Review the layout before you rely on it for decisions.”
This approach is especially important with older blueprints, photocopied plans, and drawings that have been altered over time. Symbols may be faint, dimensions may conflict, and existing conditions may differ from original documentation.
Step 3: Add Functional Interior Design Layers
After the base floor plan is correct, an AI room planner or 3D planning tool can help designers explore space use. Start with function before style. Ask what must happen in each room, who uses it, what must be stored there, and how people move through the space.
For example, a living room redesign may need seating for six, a media wall, child-friendly circulation, and reading light near a window. A kitchen renovation may need an improved work triangle, more pantry storage, landing space near appliances, and a clear route to the dining area.
Plan in layers
- Fixed elements: Retain walls, plumbing, windows, fireplaces, stairs, and structural constraints.
- Primary furniture: Place beds, sofas, dining tables, desks, islands, and major storage.
- Circulation: Review walking paths, door clearance, chair pull-out space, and access to windows.
- Secondary pieces: Add occasional tables, lamps, rugs, benches, and accessories.
- Style direction: Test finishes, colors, textures, and lighting after the layout works.
Keeping these layers separate prevents a common mistake: choosing a visually appealing style before confirming that the room functions well.
Step 4: Create Renovation Previews That Answer Real Questions
The strongest 3D renders do more than look polished. They answer specific client questions. Rather than presenting a single decorative image, create a small set of views that make comparisons easy.
- What changes if the wall between the kitchen and dining room is opened?
- Will a sectional make the living room feel crowded?
- Does the proposed island leave enough aisle space?
- How does the room feel with light oak flooring versus darker wood?
- Would built-in storage improve an awkward alcove?
- Can an empty room support a guest room and home office function?
For exterior refresh concepts, use the same principle. Show how siding color, entry updates, landscaping, path materials, porch lighting, or window trim may work together. Keep structural claims separate from visual concepts unless they have been reviewed by the appropriate professionals.
Choosing Between 2D, 3D Floor Plans, and Perspective Renders
Each visual format serves a different purpose. Interior designers often get better feedback when they combine formats rather than relying on one image type alone.
| Format | Best Use | Limitation |
|---|---|---|
| 2D floor plan | Measurements, furniture positioning, and efficient layout review | Can be difficult for clients to visualize |
| 3D floor plan | Room relationships, circulation, and overall spatial understanding | May not show material detail realistically |
| Perspective render | Mood, finishes, lighting, and client presentation | Can hide dimensions and adjacent-room context |
A practical presentation sequence is to start with the labeled 2D plan, follow with a 3D overhead view, then show selected eye-level renders. This lets clients understand both the logic of the design and the intended atmosphere.
Common Blueprint-to-3D Mistakes to Avoid
Even efficient design workflows need quality control. Watch for these frequent problems before sharing a model or using it to guide purchasing decisions.
- Assuming every line is a wall: Plans may include cabinetry, furniture outlines, dimensions, or demolition notes that confuse automated detection.
- Ignoring scale checks: One wrong measurement can distort an entire floor plan conversion.
- Forgetting door clearance: A furniture layout may look good from above but fail when doors open.
- Using generic furniture sizes: Replace placeholders with approximate real product dimensions before final approval.
- Overloading the render: Too many accessories can distract from important planning decisions.
- Presenting concepts as technical approvals: 3D visuals support design communication; they do not replace permits, engineering, or contractor verification.
Frequently Asked Questions
Can a blueprint to 3D converter work with old plans?
Yes, provided the drawing is reasonably clear. Older plans may require more manual correction because faded lines, unusual symbols, and incomplete dimensions can reduce automatic recognition accuracy.
Are 3D renders accurate enough for furniture shopping?
They can be useful for early selections when the model has been checked against real dimensions. Before ordering large furniture, appliances, cabinetry, or custom pieces, verify all measurements on site.
How many views should an interior designer present?
For most rooms, one overhead 3D floor plan plus two or three perspective views is enough. Add comparison images only when they help a client decide between meaningful options.
Make 3D Conversion Part of a Repeatable Design Process
A blueprint to 3D workflow is most valuable when it becomes repeatable: prepare the plan, verify geometry, build functional layouts, test design directions, and export only the views that support a clear decision. This process helps designers spend less time explaining abstract drawings and more time refining solutions around the client’s real needs.
For designers who want to explore this approach on mobile, Floor Plan to 3D & Home Redesign offers a way to turn black-and-white plans into editable visual starting points for room planning, home redesign, and presentation-ready 3D renders.
