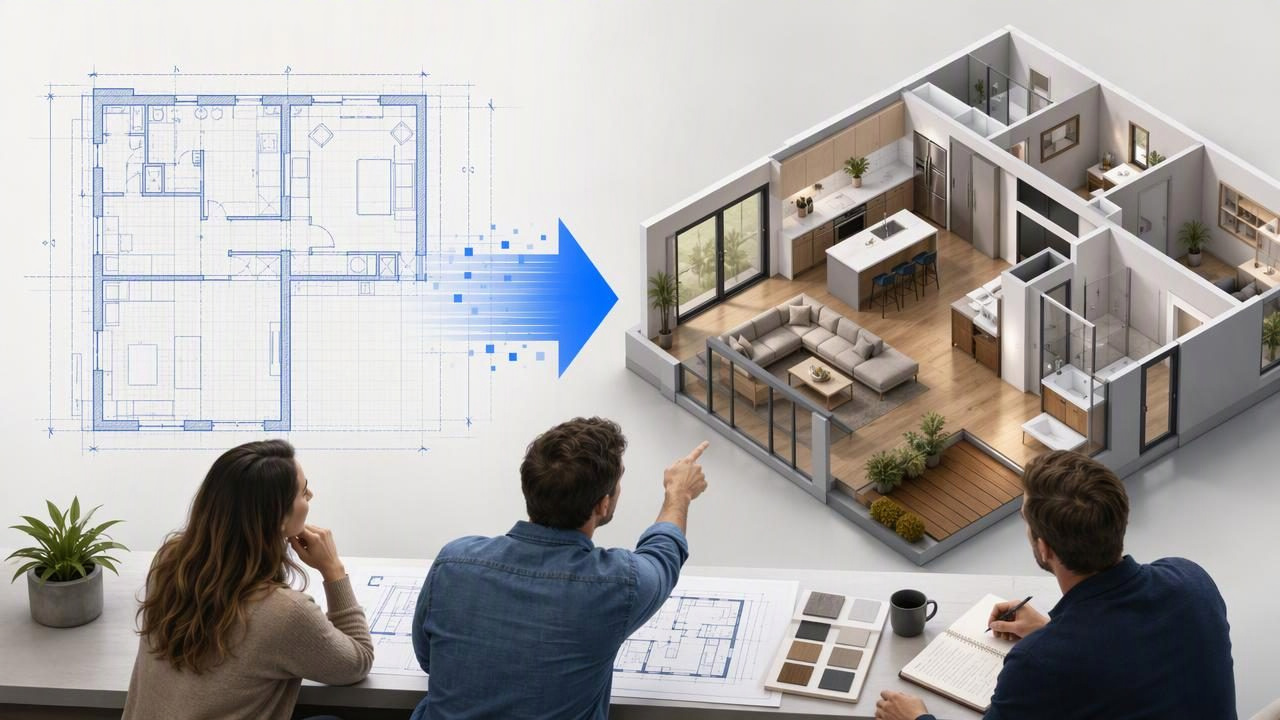
A floor plan can communicate measurements, walls, doors, and room names efficiently, but it does not always help everyone imagine the finished space. Homeowners may struggle to picture circulation, furniture scale, natural-light direction, or how an open-plan layout will feel. That gap can lead to vague feedback such as “it seems too small” or “I’m not sure about the kitchen,” which is difficult to turn into a practical renovation decision.
A blueprint to 3d converter for realistic design previews can make those conversations more specific. Instead of reviewing only a black-and-white drawing, a project team can discuss a visual concept that shows rooms, openings, finishes, furnishings, and broad spatial relationships. The goal is not to replace technical documentation. It is to create a clearer shared reference before final construction, engineering, and purchasing decisions are made.
This guide explains how to use 3D design previews in a review meeting, which questions to ask, and how to record useful feedback without treating a generated image as a construction-ready model.
Why 2D blueprints can cause avoidable review problems
Blueprints are essential documents, particularly for designers, builders, and other professionals accustomed to reading plans. Yet people interpret drawings differently. A wide room on paper can feel narrow once furniture, storage, and walking paths are considered. Similarly, a doorway that appears unobtrusive in a plan may interrupt a wall that a homeowner expected to use for shelving or artwork.
Visual previews help translate a layout into questions that people can answer with greater confidence:
- Does the proposed furniture arrangement leave a comfortable route through the room?
- Will the kitchen island make the room feel more connected or more crowded?
- Which wall is best for a television, bookcase, or focal artwork?
- Does a new opening improve the relationship between two spaces?
- Do the selected materials support the intended style and light level?
- Does an exterior refresh suit the home’s existing character?
These are design-review questions, not engineering questions. The distinction matters. A visual preview can support early agreement on intent, while drawings, site measurements, applicable codes, and qualified professionals remain necessary for technical validation.
Start with a review objective, not just a render request
The most useful 3D preview begins with a defined decision. Asking for a general “realistic render” can produce an attractive image, but it may not resolve the issue that is slowing down a renovation. Before converting a plan, write down the one or two choices the meeting needs to address.
| Review objective | Helpful preview focus | Decision to document |
|---|---|---|
| Improve an awkward living room | Seating zones, routes, windows, and media wall | Preferred furniture layout and focal wall |
| Plan a kitchen renovation | Cabinet runs, island placement, dining connection | Island concept, storage priorities, style direction |
| Assess an empty property | Staged furniture and room purpose | Target use of each room for marketing or planning |
| Refresh a front elevation | Exterior colors, entry details, planting concept | Preferred curb-appeal direction for further research |
A focused objective also prevents unnecessary revisions. If the immediate question is whether a dining table fits comfortably beside a kitchen island, do not spend the meeting debating every cabinet handle, pillow, and paint shade. Record the high-impact spatial decision first, then refine decorative details later.
A concrete example: reviewing a kitchen and dining layout
Consider a homeowner renovating the rear of a two-bedroom house. The existing plan shows a narrow kitchen, a separate dining room, and a proposed wider opening between the spaces. The homeowner likes the idea of an island but worries that it will make the layout difficult to move through.
For the review, the team creates two visual concepts from the same source plan:
- Option A: a compact island with seating on one side and a clear visual connection to the dining table.
- Option B: a larger island with more storage but a tighter route between the kitchen and dining area.
Rather than asking, “Which image do you like?” the reviewer asks more practical questions:
- Which option better supports how the household enters the kitchen with groceries?
- Where would guests stand while someone is cooking?
- Can a chair be pulled out from the dining table without conflicting with the kitchen zone?
- Does the wider opening make the two rooms feel intentionally connected?
- Is additional island storage worth the perceived reduction in openness?
The result might be a decision to keep the compact island but request a different storage solution elsewhere. That is a productive outcome because the preview has helped the homeowner express a real priority: circulation and social space matter more than maximizing island cabinetry.
However, the team should not conclude that the shown clearances are exact or that appliances, cabinetry, and structural changes will fit precisely as pictured. The concept must be checked against current measurements, product specifications, and the detailed work of appropriate professionals.
How to prepare a plan for a useful visual discussion
Source quality affects what viewers can reasonably interpret. A clear, complete plan gives a converter more context than a faint photocopy with missing labels. Still, even a clean input does not guarantee accurate generated geometry or construction dimensions.
Include the details that shape the conversation
- Room labels that identify each area’s intended use.
- Visible walls, doors, windows, and major openings.
- Dimensions or scale information where present on the original source.
- Notes about fixed elements, such as stairs, fireplaces, plumbing zones, or built-in storage.
- A clear indication of the area being reviewed if the plan contains multiple floors.
Remove distractions where possible
Crop out unrelated pages, duplicate scans, and handwritten notes that obscure walls or labels. If a plan includes a proposed layout and an existing layout, identify which version should guide the concept. If the image is tilted or difficult to read, improving its legibility before conversion can make the review easier, but it does not correct uncertainty in the original drawing.
Review the generated layout before discussing style
One of the most important habits in AI-assisted home redesign is to check the layout against the source before evaluating whether the image looks appealing. A polished room can distract from a misplaced opening, an omitted wall, or a furniture arrangement that does not reflect the proposed plan.
Use a simple comparison pass:
- Compare the number and general placement of rooms.
- Check major walls, openings, doors, and windows against the original plan.
- Confirm that room labels or intended uses have been interpreted sensibly.
- Look for obvious changes to stairs, fireplaces, or other fixed features.
- Identify any uncertain area before using the preview to make a decision.
Useful rule: Treat a 3D image as a discussion aid when it reflects the source broadly enough to answer the review question. Treat it as a reason to investigate further when a visible feature conflicts with the source plan.
This review step is especially important when stakeholders are considering a costly change, such as removing a wall, moving a kitchen, adding an exterior opening, or changing a room’s use. The preview may reveal questions worth taking back to the designer or contractor, but it does not approve the work.
Run a better design review meeting in 20 minutes
A short, structured meeting can be more effective than an open-ended discussion. Display the source blueprint beside the 3D concept, so participants can connect the visualization to the underlying layout.
- Set the decision: State what must be chosen today, such as the preferred kitchen layout or living-room furniture zone.
- Compare source and concept: Spend a few minutes identifying major matching features and visible uncertainties.
- Walk through daily use: Discuss entry, storage, cooking, seating, cleaning, work, and entertaining as relevant.
- Compare alternatives: If two concepts exist, evaluate each against the same practical criteria.
- Record outcomes: Separate approved design intent from items requiring measurement, pricing, or professional confirmation.
This structure reduces the risk that visual preference alone drives a decision. A bright, photorealistic concept may be inspiring, but a successful renovation also needs to support the household’s routines, budget, existing conditions, and technical constraints.
Record feedback in a format the project can use
After a review, turn comments into a brief decision log. This is more valuable than relying on a collection of screenshots or a vague memory of what someone liked. Keep each entry specific and identify whether it is a decision, a question, or an assumption.
Area: Kitchen and dining room
Decision: Prefer the compact island concept.
Reason: Keeps the route to the dining table feeling more open.
Follow-up: Confirm actual clearances and cabinet dimensions.
Open question: Can pantry storage move to the adjacent wall?
Status: Requires design and site-measurement review.
A simple log helps homeowners, designers, and contractors distinguish a visual preference from a confirmed specification. It also makes later meetings faster because the group can see what has already been agreed and what still needs verification.
Know the limits of blueprint-to-3D previews
Realistic design previews are valuable because they make abstract ideas easier to discuss. They should not be mistaken for measured CAD or BIM models, engineering documents, permit drawings, or guaranteed construction dimensions. A generated image can miss, simplify, or reinterpret details in the source, and a source plan itself may be outdated or incomplete.
Before committing to construction, verify all critical items through appropriate channels, including site measurement, structural assessment where needed, building regulations, product data, and professional drawings. This protects the project from decisions based on assumptions that looked convincing in an image.
Make the preview serve the decision
The strongest use of a blueprint-to-3D workflow is not simply creating a beautiful image. It is helping people see the consequences of a layout or style choice early enough to discuss it clearly. Choose a specific review objective, compare the concept with the source plan, test the design against everyday routines, and document what still requires confirmation.
For homeowners and design teams exploring this approach, Floor Plan to 3D & Home Redesign’s floor-plan-to-3D guide explains how visual concepts can be created from plans while keeping the original layout details in view for review.
